Breakfast Pizza

Ok, I know, I haven’t posted in over 6 months! How dare I!  But last semester was long and challenging…but good news, I GRADUATED!!  And now I am officially a grad student.

So then why did I not have oodles and oodles of time to cook over the summer?  Because I worked at a wonderful camp called Birch Trail for 9 weeks.  Yes, it was amazing.  No I did not cook anything while I was there. But it was a great summer!

But onto the important part…the food!  As some of you may know, my all-time favorite meal is breakfast.  I love eggs, bacon, sausage, waffles, pancakes, french toast, hashbrowns…the whole 9 yards.  But I wanted to try something a little different when cooking at home.  I got the inspiration for this breakfast pizza from a restaurant I went to with some of my friends over Labor Day weekend called the Armsby Abbey.  Although I did not end up ordering the breakfast pizza there, I made a mental note that I had to try making something similar when I got back to my apartment.

So without further ado, here is my version of the Breakfast Pizza

Image

Breakfast Pizza
Ingredients
1 bag prepared whole wheat pizza dough (I got mine from my local gorcery store)
1 lb fresh mozzarella cheese, sliced
3 thick slices Canadian bacon, cooked, chopped
3 eggs
2 medium tomatoes, diced
green onions, sliced for garnish
Directions
  1. Preheat oven to 450 degrees F
  2. Divide pizza dough into three sections and roll each section into a ball.  Roll out each portion of dough into a 9-inch circle
  3. Prepare the toppings. Slice the mozzarella, chop the bacon, scallions, and tomatoes.
  4. Place one 9-inch circle of pizza dough on a greased baking sheet and spread the mozzarella in an even layer on the dough. Top with the bacon. Crack an egg in the center of the dough and bake in the oven for 15 minutes or until the crust is golden and the whites of the egg are cooked. Remove pizza from the oven and top with fresh tomatoes and sliced green onions. Repeat with remaining 9-inch dough rounds.
  5. Enjoy (with others, or by yourself…like I did) 😉

Recipe adapted from cherryonmysundae

I promise that I will try to post as much as possible this semester.  Every time I make something I take a picture of it (yes, I’m one of those people), so I might as well put it on my blog too!

I hope this inspires some of you to look at breakfast in a different way! Enjoy!

Korean-inspired Pizza

Well I’m back, and I want to apologize fo my long hiatus.  But as you can imagine, I was on winter break and preoccupied.  This recipe actually comes somewhat from an experience I had while I was traveling to India this past December.  We always take Korean Airlines to India which means that we have a layover in Seoul, South Korea.  During our 3 hour layover there, my dad convinced me to get a kimchi noodle bowl.  It was just about the best thing I have ever put in my mouth.  Don’t get me wrong, I have definitely had kimchi before, but this just reminded me how much I loved it.

Then after coming back from India, I had my wisdom teeth out and was in front of the TV for a week which obviously meant I watched the Food Network.  On one show, a restaurant’s specialty was a Korean pizza.  It then clicked in my head that kimchi would taste delicious on a pizza with a few other ingredients, and I decided to make it as soon as my mouth was healed enough to enjoy it!

So with all that in mind, here is the recipe for Bacon Kimchi Pizza:

Image

Ingredients
  • 1 ball store-bought pizza dough
  • Organic tomato sauce (about ½ of a 15 oz. can)
  • Freshly grated low-moisture mozzarella cheese (about 2 cups)
  • 1 cup kimchi, coarsely chopped
  • 4 strips crispy cooked bacon, crumbled
  • 3 scallions, root ends trimmed
  • drizzle of sesame oil
Directions
  1. Preheat oven to 500°F and place a rack in the lowest possible position. Lightly grease a pizza pan or rimmed baking sheet with non-stick spray or olive oil OR if you own a pizza stone, place it in the oven before you turn it on, and let it heat up.
  2. Stretch pizza dough into a round shape large enough to fit your pizza pan or to fit on pizza stone. Use flour or cornmeal to make the dough easily slide from the wooden pizza board to the stone in the oven.
  3. Start by spooning on the tomato sauce. Using the back of the spoon, spread the tomato sauce evenly over the dough. (Less is more when it comes to tomato sauce.) Next, sprinkle cheese then chopped kimchi and crumbled bacon over the pizza. Thinly slice white and light green parts of each scallion and scatter on the pizza. Thinly slice remaining dark green stalks on a bias and reserve.
  4. Transfer pizza to the preheated oven and cook until the crust is golden brown (on a pizza pan about 11 – 13 minutes, on a stone 5-6 minutes). Remove pizza from the oven and let cool for a few moments.
  5. Finish with a sprinkling of sliced scallion greens and a small drizzle of sesame oil. Cut pizza into even slices and serve hot.

Recipe adapted from kitchenkonfidence.com

Hope this encourages some of you to use delicious ingredients in new ways!  It certainly made me think out of the box! Enjoy!

Halloween Popcorn

Halloween has always been one of my favorite holidays.  It is the one day (or multiple days in college) of the year when you can dress up as anything you want and no one will question why.  I take a lot of time to figure out my costume and I have never in my life bought a costume.  I always put it together from pieces of clothing I own or sew it myself.  It’s more fun and creative that way.  The other thing I love about Halloween is the candy (who doesn’t).  Just like all the trick-or-treating kids, I can’t wait to get my hands on some candy.  But eating that much candy is obviously not very healthy, so I came up with something just as tasty but consisting of less sugar.

Here is the recipe for my Halloween Popcorn

Image

INGREDIENTS

  • 1 bag kettle corn or salted popcorn, popped by bag instructions
  • 1/3 cup candy corn
  • 1/4 cup semi sweet mini chocolate chips
  • 2 teaspoons vegetable oil

DIRECTIONS

  1. Cover a baking sheet with wax paper and spread out the popcorn so that it is in one layer
  2. Put the candy corn in a microwave-safe bowl and microwave in 30 second intervals siring after each interval. Once the candy corn has melted, use a spoon to drizzle it over the popcorn.
  3. Place the chocolate chips in a microwave-safe bowl and microwave at 30 second intervals siring after each interval.  When the chocolate has completely melted, add the vegetable oil to the melted chocolate.  This will help the chocolate drizzle better over the popcorn.  Use a spoon to drizzle the chocolate over the popcorn.
  4. After both the melted candy corn and chocolate have been drizzled over the popcorn, let the popcorn sit for about 20 to 30 min so that the candy and chocolate hardens.
  5. Once hardened, remove from baking sheet, break into smaller pieces, and serve!

This is a nice easy (and healthier) way to enjoy Halloween candy without actually consuming that much candy! A win-win situation all around.  It is also really quite cheap and one batch of this only costs about $1.50 to make! I ended up serving this at a small Halloween party I threw for my friends, and it went FAST!  So let the kids have the candy and help yourself to some Halloween popcorn! Enjoy!

Pumpkin Pie for Breakfast

I have always loved the amazing taste of pumpkin pie.  It reminds me of beautiful fall days and getting together with family and friends for the holidays.  But the problem I always have with pie is that it is served as dessert.  Being such a foodie, I am usually too full from an amazing dinner to have room in my stomach for pie.  I can’t fully enjoy my pie if I’m already stuffed full from a previous meal.  So this is the solution…have it for breakfast!!  That way I can start the day with the delicious flavor of pumpkin and I can fully enjoy the taste of it because I will not be suffering from the food coma of a prior meal.

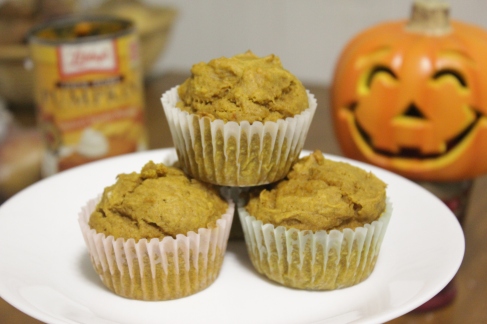
Because this recipe is the breakfast version of pumpkin pie, it is in the form of a muffin (a traditional breakfast food) but it still has all the flavors and spices that a normal pumpkin pie would have.  It’s perfect for a crisp fall morning when I’m running to class and don’t have enough time to sit down and eat a bowl of cereal.

Here is the recipe for Pumpkin Pie Muffins

Image

Pumpkin Pie Muffins
Makes about a dozen

  • 1 cup pumpkin puree (not pumpkin pie filling)
  • ¾ cup sugar
  • 1/3 cup vegetable oil
  • 2 eggs
  • ¾ teaspoon cinnamon
  • ½ teaspoon ginger
  • 1/8 teaspoon cloves
  • 1/8 teaspoon nutmeg
  • ½ teaspoon baking soda
  • ½ teaspoon salt
  • 1½ cups flour
  1. Preheat the oven to 350ºF.
  2. In the bowl of an electric mixer, combine the pumpkin, sugar, vegetable oil, and eggs. Mix until smooth.
  3. In a separate bowl, whisk together the cinnamon, ginger, cloves, nutmeg, baking soda, salt, and flour.
  4. Gradually add the dry ingredients to the pumpkin mixture, and mix on low until just combined.
  5. Divide the batter among lined muffin tins, filling each cup ¾ full.
  6. Bake for 17-22 minutes, or until a toothpick stuck in the middle comes out with just a few crumbs.

Recipe courtesy of SnixyKitchen.com

Although pumpkin pie is a classic fall food, it is sometimes fun to present those flavors in a new way.  I chose muffins because breakfast is my favorite meal of the day.  I hope you enjoy these muffins as much as I (and my roommates) did! Enjoy!