Prosecco Cake!

Well hello there.  Yes, it’s been over a year since I last posted a recipe and I apologize.  But now I’m back. Let me fill you in on my year of non-blogging adventures.

  • Got a job at at a company that imports Italian food and wine. WIN!
  • Tried a new type of dance and loved it
  • Finally went wine tasting in Napa
  • Watched Lord of the Rings more than 30 times (can you tell I’m a fan?)
  • Became a regular at a dumpling restaurant
  • Ate my weight in tacos

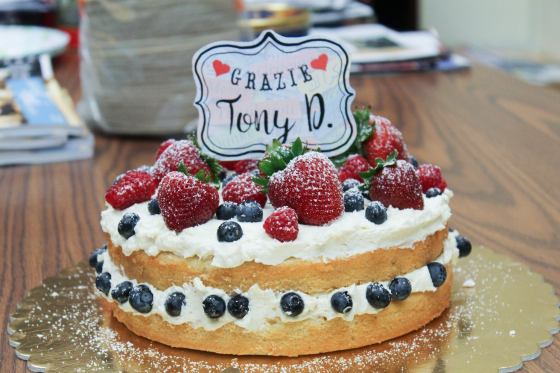
Now that you know these things, lets get to the important stuff, THE CAKE!

I’ve developed quite a reputation at work for my baking and I love it! It means I get to bake all kinds of cool things and people will actually eat it all.  Major win. When my boss asked me to make “one of my cakes” for a longtime employee who was retiring, I immediately started brainstorming cake ideas.  After consulting with a co-working, I decided on a celebratory Champagne cake.  But remember, this is an Italian company, run by really awesome Italian people. I can’t go using FRENCH sparkling wine in my cake.  Quick fix? Prosecco!  And thus, the Prosecco Cake was born!

Here is the recipe for the Prosecco Cake with Whipped Buttercream and Raspberry Filling.

13575868_1771505553095350_2593466226975521300_o

Yield: two 9 inch cakes

Prosecco Cake

Ingredients:

  • 2 cups cake flour
  • 2/3 T baking powder
  • 1/3 teaspoon salt
  • 4 egg whites
  • 2/3 cup Prosecco (not too dry)
  • 1 1/3 teaspoons vanilla extract
  • 1 1/2 T vegetable oil
  • 1 1/3 cup granulated sugar
  • 2/3 cup unsalted butter

Method

  1. Preheat the oven to 350 degrees, grease and flour 2 (9 inch) pans.  
  2. In a medium size bowl whisk together the flour, baking powder and salt. Set aside
  3. In another bowl combine the egg whites, champagne, vanilla and vegetable oil. Whisk until blended and set aside.
  4. In the bowl of your mixer, cream the butter and sugar 3 to 5 minutes. When it is light and fluffy add approximately 1/3 of the dry ingredients and mix until blended. Slowly add 1/2 of the liquid ingredients and mix until blended. Continue alternating dry and wet ingredients ending with dry and mix until blended. Add the pink color at this time.
  5. Pour into prepared pans and bake 15-20 minutes. The cake is done when a toothpick inserted the center comes out clean. Cool in baking pans 10 min. then turn out.

(recipe adapted from http://www.mycakeschool.com/recipes/pink-champagne-cake/)

Whipped Buttercream

Ingredients:

  • 1 cup milk
  • 5 tablespoons flour
  • 2 teaspoons vanilla extract
  • 1 cup butter, at room temperature
  • 1 1/4 cups granulated sugar (not powdered sugar)
  • zest of one lemon (optional)

Method

  1. In a medium saucepan, whisk one cup of milk with 5 tablespoons of flour. Heat over medium until the mixture begins to sputter, whisking constantly. Continue to stir as the mixture thickens. You will know it’s done when it reaches the consistency of thick cake batter, after about 7 minutes of heating and whisking. Stir in 2 teaspoons vanilla extract and set aside to cool COMPLETELY.
  2. Now, in the bowl of a stand mixer fitted with a whisk attachment, or using a hand held mixer, beat 2 sticks of softened butter (1 cup) with 1 1/4 cups of granulated sugar until light, fluffy, and white in color, about 3 solid minutes of beating on medium-high speed. You want the sugar to be totally incorporated into the butter. NOTE: the sugar will not be dissolved.  The graininess will go away in the next step when the milk mixture is added.
  3. Be sure that the milk/flour mixture has completely cooled, and add it to the butter/sugar mixture. Beat all ingredients for about 1 minute on high speed, scraping down the bowl halfway, until they are smooth and well blended. The frosting should be as light and fluffy as whipped cream.

(recipe courtesy of http://www.andiemitchell.com/the-best-whipped-frosting/)

Raspberry Filling

Ingredients:

  • 2 cups raspberries
  • 1/2 cups plus 2 tablespoons water
  • 1/2 cup sugar
  • 2 tablespoons cornstarch

Method

  1. In a saucepan, combine the raspberries, 3/4 cup of water and the sugar. Bring to boil.
  2. Simmer for 15 to 20 minutes or until the raspberries have broken down.
  3. Remove the mixture from the heat and strain in a fine-mesh sieve. Return the strained mixture to the heat.
  4. Dissolve the cornstarch in the remaining 2 tablespoons of water. Whisk the slurry into the raspberry mixture.
  5. Bring the mixture back to a boil and simmer for 5 more minutes. Remove from heat and cool completely.

(Recipe adapted from http://emerils.com/120077/raspberry-filling)

I chose to decorate this cake with fruit and powdered sugar, which was a nice, simple, and fresh presentation.  Everyone absolutely loved it and are now dropping hints that I should open a bakery.  I call that a win.

I hope you enjoy this recipe as much as I did!

Almost Famous Blueberry Buttermilk Scones

Hello again my lovely followers!  Let me start this post by saying that this is the most requested recipe that my friends and family ask me to make.  I started making these babies when I was in third grade and the recipe has stuck with me ever since. In elementary school, my mom taught the cooking elective, and as you can probably imagine, I was always first in line to cook and taste every dish we made.  I kept the scone recipe that we used, and have been baking these ever since.

When I was studying abroad in England (spring of 2012), I made about seven or eight batches of these scones because my friends just kept asking for more.  When I returned to Clark for my final two years of school, I baked these for anything from dinner parties, to nights of tea and Netflix.  They just go with everything!  This has become a go-to recipe for me as I continue on my baking adventures.  In the words of my dad, “there is just something unique about these scones that I have never really tasted before.”

So without further ado, here is my recipe for Blueberry Buttermilk Scones

blueberry buttermilk scones

Ingredients:

  • 1 ½ c. flour
  • 3 T. sugar
  • 1 ¼ t. baking powder
  • ¼ t. baking soda
  • ½ t. salt
  • 6 T. cold unsalted butter, cut into small pieces
  • ½ c. buttermilk
  • 2 T. dried blueberries

Directions:

  1. Preheat oven to 425°.
  2. Mix buttermilk with dried fruit to soften fruit.
  3. Stir dry ingredients together with a fork.
  4.  Add cold butter pieces and using your fingertips, work the butter into the dry ingredients until the mixture resembles coarse cornmeal.  It’s OK if some larger pieces of butter remain; it adds to flakiness.
  5.  Pour in buttermilk and fruit mixture and mix with a fork until ingredients are just moistened.  You’ll have a soft dough with a rough look.  (If the dough looks dry, add a little more buttermilk, about ½ T.)
  6. Gather the dough into a ball and knead it very briefly on a lightly floured board, about 10 times.  The dough should not be sticky and should barely come together.
  7.  Pat dough into a ½ inch thick circle about 7 inches across. It is OK if the dough pulls apart a little.
  8. Place scones on an un-greased baking sheet and brush the dough with buttermilk and sprinkle with sugar.
  9. Cut the circle into 6 equal triangles. Do not separate the triangles from each other.
  10.  Bake for 10 – 12 minutes until tops and bottoms are golden.  When you push lightly on the top of the scone, it should barely give.
  11. Transfer to a rack and cool slightly.

I think one of the reasons why these scones are always a big hit is because they are moist but not too sweet.  As many of you may know, I am more of a savory kind of gal, so I don’t put as much sugar in my scones as many other recipes call for.  I think the blueberries give the scones a unique natural sweetness that too much sugar would just cover up.

Hope these scones make you feel warm and fluffy. I recommend enjoying them with a hot cup of masala chai. Cheers!

Spaghetti Squash with Avocado Dressing

Ok, so I have to admit, I made this about 4 months ago and completely forgot to post it because of finals and such, but I am posting it now because it was an absolutely AMAZING recipe.  As many of my friends know, I am not a huge fan of pasta, but I see all kinds of pasta sauces I want to try.  My solution? Spaghetti squash; similar texture to pasta, but rather than loading up my diet with carbs, I’m eating veggies instead! Good deal!

I came across this avocado dressing recipe while roaming the abyss of Pinterest one night and I decided that I HAD to try it, seeing as avocado is one of my all-time favorite foods.  I also decided to add some more texture to this dish by throwing in some seasoned ground beef.  Overall, this dish came out REALLY GOOD! I haven’t had time to make it again, but it is definitely at the top of my list!

Here is the recipe for Spaghetti Squash with Avocado Dressing

with sauce1

For the Squash

Ingredients:

  • 1 Spaghetti Squash
  • Olive Oil
  • Sea Salt (table sale is fine)
  • Italian Seasoning (optional)
  • Cookie sheet

Directions:

  1. Preheat the oven to 350º
  2. CAREFULLY cut the squash in half the long way
  3. Place the two halves on a cookie sheet, drizzle with Olive Oil, Salt and seasoning
  4. Do not scoop out the seeds yet, it is a lot easier to do after it has roasted for a bit.
  5. Roast the squash for about an hour, remove from the oven
  6. Use a fork and lightly scrape the top layer from one end to the other, all the seeds should come up with it.
  7. Discard the seeds and top layer. Loosen up the sides and bottom a little bit, return the oven and bake for 20 more minutes
  8. Scrape the squash out into a bowl.

For Ground Beef

  • ½ pound ground beef
  • salt and pepper to taste
  • ½ tsp red pepper flakes
  • 1 tsp grill seasoning

Brown meat in pan and add seasonings listed above.  Once meat is cooked, combine with squash.

For Avocado Dressing

Ingredients:

  • 1 medium sized ripe Avocado, pitted
  • 1/2 lemon, juiced
  • 1-3 garlic cloves, to taste
  • 1/2 tsp kosher salt, or to taste
  • 1 tsp dried basil
  • 3 tbsp extra virgin olive oil
  • Freshly ground black pepper, to taste

Directions:

  1. Place the garlic cloves, lemon juice, and olive oil into a food processor. Process until smooth. Now add in the pitted avocado, basil, and salt. Process until smooth and creamy.
  2. Pour sauce on spaghetti squash and meat and toss until fully combined. Serve immediately.

dressing recipe courtesy of http://ohsheglows.com

I loved the combination of the textures in this recipe.  You’ve got the creaminess of the avocado, the slight crunch from the squash, and the amazing meaty goodness of the well-seasoned beef.  All-in-all, a wonderful meal!  I will definitely be using avocado in more dressings in the future!

Enjoy!

Playing with Pancakes

As many of you may know, I am absolutely obsessed with breakfast, so it is only natural that I love pancakes.  Over the past few months I have been really interested in how different types of pancakes are made, and I have been looking at all kinds of recipes to try and find a pancake that is unique, and somewhat healthier than the traditional buttermilk pancake.

While looking on Pinterest one day, I came across a banana pancake recipe that was literally just a mashed banana and an egg.  I immediately ran to the kitchen to try it out, seeing as bananas and eggs are both a huge part of my diet.  The pancake came out well, but I found it to be way too moist.  It was hard to flip it without it falling apart.  But after that pancake adventure, I decided that I would continue to make that banana pancake, but each time I made it, I would alter the recipe a little, just to see what would happen.  After about a week of pancake experimenting, I finally had a solid recipe that I was very happy with and that is what I am sharing with you now.  I just love how versatile a pancake can be!

Here is my recipe for Banana Oat Pancakes

Image

Ingredients

1 cup Old Fashion Oats

1/2 banana, mashed

1/4 cup whole wheat flour

1 egg

1/4 cup milk

2 Tbsp Honey

1 Tbsp unsweetened applesauce

1 tsp baking powder

1/2 tsp salt

coconut oil for pan


Directions

Mix all ingredients together until just combined.  Heat pan on medium and add coconut oil.  Use a 1/4 cup measure to spoon batter into the pan.  Wait for bubbles to appear around the edges of the pancake, about 1-2 minutes, and then flip.  Repeat with the rest of the batter.

And that’s it! Easy, right? And so delicious (and healthy!)  I encourage everyone to play with this recipe too, and let me know if you come up with something even better.  After I made this, I thought adding cinnamon and a little nutmeg might make it even better!

Keep experimenting and Enjoy!


Pumpkin Oat Streusel Muffins

It’s only November 8th and I am already seeing Christmas EVERYWHERE! No. Not okay. Christmas doesn’t come until AFTER Thanksgiving.  In my mind, it’s still fall, and that means more baking with pumpkins, apples, cinnamon and nutmeg.  I had some leftover pumpkin in the fridge, so I started looking up recipes.  I don’t know if I have said this before, but I get most of my recipes from foodgawker.com.  That’s where the creative cooks live.  It is a website that is very focused on the visuals of food, which is always important.  My favorite part about it, however, is that almost all the recipes are from food blogs.  I am able to find all kinds of creative recipes that I would not normally come across if I just did a Google Search.

I narrowed my search down to two muffin recipes and decided to combine different aspects of them.  The result was this AMAZING muffin that I will absolutely be making again.  Did I mention that the apartment smelled like pure heaven?

Here is the recipe for Pumpkin Oat Streusel Muffins

Image

Ingredients
Muffins

½ cup butter, softened
¾ cup pumpkin puree
½ cup brown sugar
2 eggs
½ tsp. salt
1 tsp. baking soda
2 tsp. baking powder
1 tsp. pumpkin pie spice
¾ cup quick oats
1½ cups flour

Streusel Topping

1/3 cup oats
1 tablespoon flour
1/3 cup brown sugar
1/2 teaspoon cinnamon
Dash of nutmeg
2 tablespoons cold butter, cut into chunks

Directions
  1. Preheat Oven to 350 degrees F
  2. Cream butter and brown sugar in a bowl. Add pumpkin and eggs and mix well.
  3. In a separate bowl, add salt, baking soda, baking powder, spice, and oats. Add flour and mix until combined.
  4. Slowly fold dry mixture into wet mixture.  Stir until just combined
  5. For the streusel topping: in a small bowl mix together the oats, flour, brown sugar, cinnamon, and nutmeg. Mix in the butter with your hands until the mixture is crumbly.
  6. Divide batter evenly between 12 muffin cups. Sprinkle streusel topping evenly over each muffin.
  7. Bake for 22-25 minutes, until lightly browned on top or toothpick inserted comes out clean

Muffin recipe adapted from jensfavoritecookies.com

Streusel topping recipe adapted from twopeasandtheirpod.com

This is the last month to enjoy fall so I suggest you do so by making some of these muffins to share with your friends. They are good, trust me! I am on my third one.  Enjoy!

Apple Chips: Just in time for fall!

Okay, fall is by far my favorite season of the year, and living in New England, that means beautiful fall foliage, sweater weather, scarves, boots, pumpkin spice lattes, cider donuts, and apple picking.  Two weeks ago I went apple picking for the first time with one of my friends.  It was an absolutely beautiful day and the contrast of the red Gala apples against the stunningly blue sky and the bright green leaves was just incredible.  But even better was picking and eating tons and tons of apples (my apple of choice was Fuji).

Once I got home, I wanted to make anything and everything apple related.  I started out by making a batch of applesauce, then an apple oat bread that was not my favorite because I’m pretty sure i didn’t put enough sugar in it AND undercooked it (whoops).  I then used my applesauce to make one of the best banana breads ever to enter my kitchen (recipe here).  After these adventures I decided that I wanted an apple snack.  I came across the idea for apple chips on Pintrest one day when I was putting off doing an assignment for one of my classes.  These things are so easy to make and they taste so yummy!  I have to admit, I finished them in about 2 days, so I will definitely be making more!

Image

Apple Chips

Ingredients

  • 2 Apples (I used Fuji, use your favorite variety)
  • 3 tablespoons honey
  • 2 tablespoons sugar
  • 2 teaspoons ground cinnamon (add more to your liking)

Directions

  1. Preheat oven to 200°F. Line two large baking sheets with parchment paper.
  2. Mix together the sugar and cinnamon in a small bowl until combined
  3. Wash and dry the apples. Thinly slice the apples using a mandolin, to 1/16 inch. If you are using a knife, try to slice the apples to no larger than 1/8 inch. Remove the seeds from the individual slices.
  4. Spread the apples slices onto the lined baking pans making one single layer
  5. Use a pastry brush to lightly cover each slice of apple with a little bit of honey (I found it easier to melt the honey for 10 seconds in the microwave so it was easier to spread)
  6. Gently sprinkle each apple slice with a thin coating of the cinnamon sugar mixture. Turn over the apple slices and apply honey and sprinkle with the remaining cinnamon sugar.
  7. Bake for 1 hour, then flip the apples (I used my fingers to turn the apples), and bake for an additional hour. Depending on the thickness of the apples, continue to bake for additional time if needed until crispy. To test the doneness, remove the apples from the oven and allow to rest at room temperature for 5 minutes. If the apples are not crunchy, continue baking the chips. Make sure to check the color of the apples, as too much time will cause them to burn if not monitored continually.
  8. Once the apples are cooled and have become crisp, store chips in an airtight container for up to 1-2 weeks. However, they are so addicting they may not last that long!

Recipe adapted from jessicagavin.com

I found that even though some of mine were not completely crispy, they were still incredibly delicious!  How can you go wrong with apples, cinnamon sugar, and honey?  The only suggestion I have is to ALWAYS have a timer on for this recipe.  Because the apples are in the oven for so long, it is easy to forget that they are there.  This is an easy way to cook and do work at the same time!  I hope you love these as much as I did! Enjoy!

Breakfast Pizza

Ok, I know, I haven’t posted in over 6 months! How dare I!  But last semester was long and challenging…but good news, I GRADUATED!!  And now I am officially a grad student.

So then why did I not have oodles and oodles of time to cook over the summer?  Because I worked at a wonderful camp called Birch Trail for 9 weeks.  Yes, it was amazing.  No I did not cook anything while I was there. But it was a great summer!

But onto the important part…the food!  As some of you may know, my all-time favorite meal is breakfast.  I love eggs, bacon, sausage, waffles, pancakes, french toast, hashbrowns…the whole 9 yards.  But I wanted to try something a little different when cooking at home.  I got the inspiration for this breakfast pizza from a restaurant I went to with some of my friends over Labor Day weekend called the Armsby Abbey.  Although I did not end up ordering the breakfast pizza there, I made a mental note that I had to try making something similar when I got back to my apartment.

So without further ado, here is my version of the Breakfast Pizza

Image

Breakfast Pizza
Ingredients
1 bag prepared whole wheat pizza dough (I got mine from my local gorcery store)
1 lb fresh mozzarella cheese, sliced
3 thick slices Canadian bacon, cooked, chopped
3 eggs
2 medium tomatoes, diced
green onions, sliced for garnish
Directions
  1. Preheat oven to 450 degrees F
  2. Divide pizza dough into three sections and roll each section into a ball.  Roll out each portion of dough into a 9-inch circle
  3. Prepare the toppings. Slice the mozzarella, chop the bacon, scallions, and tomatoes.
  4. Place one 9-inch circle of pizza dough on a greased baking sheet and spread the mozzarella in an even layer on the dough. Top with the bacon. Crack an egg in the center of the dough and bake in the oven for 15 minutes or until the crust is golden and the whites of the egg are cooked. Remove pizza from the oven and top with fresh tomatoes and sliced green onions. Repeat with remaining 9-inch dough rounds.
  5. Enjoy (with others, or by yourself…like I did) 😉

Recipe adapted from cherryonmysundae

I promise that I will try to post as much as possible this semester.  Every time I make something I take a picture of it (yes, I’m one of those people), so I might as well put it on my blog too!

I hope this inspires some of you to look at breakfast in a different way! Enjoy!

Korean-inspired Pizza

Well I’m back, and I want to apologize fo my long hiatus.  But as you can imagine, I was on winter break and preoccupied.  This recipe actually comes somewhat from an experience I had while I was traveling to India this past December.  We always take Korean Airlines to India which means that we have a layover in Seoul, South Korea.  During our 3 hour layover there, my dad convinced me to get a kimchi noodle bowl.  It was just about the best thing I have ever put in my mouth.  Don’t get me wrong, I have definitely had kimchi before, but this just reminded me how much I loved it.

Then after coming back from India, I had my wisdom teeth out and was in front of the TV for a week which obviously meant I watched the Food Network.  On one show, a restaurant’s specialty was a Korean pizza.  It then clicked in my head that kimchi would taste delicious on a pizza with a few other ingredients, and I decided to make it as soon as my mouth was healed enough to enjoy it!

So with all that in mind, here is the recipe for Bacon Kimchi Pizza:

Image

Ingredients
  • 1 ball store-bought pizza dough
  • Organic tomato sauce (about ½ of a 15 oz. can)
  • Freshly grated low-moisture mozzarella cheese (about 2 cups)
  • 1 cup kimchi, coarsely chopped
  • 4 strips crispy cooked bacon, crumbled
  • 3 scallions, root ends trimmed
  • drizzle of sesame oil
Directions
  1. Preheat oven to 500°F and place a rack in the lowest possible position. Lightly grease a pizza pan or rimmed baking sheet with non-stick spray or olive oil OR if you own a pizza stone, place it in the oven before you turn it on, and let it heat up.
  2. Stretch pizza dough into a round shape large enough to fit your pizza pan or to fit on pizza stone. Use flour or cornmeal to make the dough easily slide from the wooden pizza board to the stone in the oven.
  3. Start by spooning on the tomato sauce. Using the back of the spoon, spread the tomato sauce evenly over the dough. (Less is more when it comes to tomato sauce.) Next, sprinkle cheese then chopped kimchi and crumbled bacon over the pizza. Thinly slice white and light green parts of each scallion and scatter on the pizza. Thinly slice remaining dark green stalks on a bias and reserve.
  4. Transfer pizza to the preheated oven and cook until the crust is golden brown (on a pizza pan about 11 – 13 minutes, on a stone 5-6 minutes). Remove pizza from the oven and let cool for a few moments.
  5. Finish with a sprinkling of sliced scallion greens and a small drizzle of sesame oil. Cut pizza into even slices and serve hot.

Recipe adapted from kitchenkonfidence.com

Hope this encourages some of you to use delicious ingredients in new ways!  It certainly made me think out of the box! Enjoy!

Pear Tart: A Holiday Treat

Well, I’m home for the holidays, and that means lots and lots and LOTS of cooking and baking with my mom.  This is a time of year I look forward to because the food is abundant and the company is wonderful.  My mom and I are usually baking up a storm in the kitchen, my dad is on the computer commenting occasionally on the smell wafting into the room, and my younger sister does not miss a beat to tell us what to make next.  Toby, our west highland terrier, is the best vacuum cleaner we could ever ask for and cleans up any morsel we drop on the floor.  All in all, a somewhat chaotic scene, but I wouldn’t ask for anything else.

This particular recipe is one of my favorites that my mom makes.  It’s a great winter dessert and is perfect after a big holiday dinner.  I always make sure it gets made when I come home from school because it is one of my favorite desserts.

Here is the recipe for Caramelized Upside-Down Pear Tart:

Image

INGREDIENTS

  • 4 large firm-ripe Bosc pears (2 pounds total)
  • 1/2 stick (1/4 cup) unsalted butter
  • 1/2 cup sugar
  • 1/2 teaspoon cinnamon
  •  Pastry dough (1 store-bought, or homemade)

DIRECTIONS

Peel and halve pears, the core (preferably with a melon-ball cutter). Heat butter in a 9- to 10-inch well-seasoned cast-iron skillet over moderate heat until foam subsides, then stir in sugar (sugar will not be dissolved). Arrange pears, cut sides up, in skillet with wide parts at rim of skillet. Sprinkle pears with cinnamon and cook, undisturbed, until sugar turns a deep golden caramel. (This can take as little as 10 minutes or as much as 25, depending on pears, skillets, and stove.) Cool pears completely in skillet.

Put oven rack in middle position and preheat oven to 425°F.

Roll out dough on a lightly floured surface with a floured rolling pin into a 12-inch round and trim to a 9 1/2- to 10 1/2-inch round. Arrange pastry over caramelized pears, tucking edge around pears inside rim of skillet. Bake tart until pastry is golden brown, 30 to 35 minutes. Cool on rack 5 minutes.

Invert a rimmed serving plate (slightly larger than skillet) over skillet and, using pot holders to hold skillet and plate tightly together, invert tart onto plate. Serve tart warm or at room temperature.

Recipe courtesy of epicurious

When my mom and I make this, we always make the pastry dough, but if you don’t have enough time to do that, store-bought dough is just as good.  I know Trader Joes has frozen pie crusts year round.

I hope you enjoy this recipe as much and my family and I do! Enjoy!

Calling All Vegetarians!

So this past week, I was looking for something new and exciting to make.  I decided on something burger related because I was craving that at the time.  But as I browsed through burger recipes, I came across this little gem.  Although I am usually beef or turkey patty kinda girl, this bean burger caught my attention.  It might be because I grew up in a house with a vegetarian (my dad), or it could be that I am subconsciously moving away from my obsession with meat (don’t worry, I’m still a bacon addict) and onto an interest in just interesting and different recipes.  This recipe is for a parmesan, kale, and white bean burger.  Yes, I have never bought kale in my life, and my mom’s jaw dropped when I told her that I had used kale in a recipe.  But HEY, you gotta try new ingredients sometimes, right?  Anyways, they turned out really well, and I chose to eat them with mixed greens and a horseradish sauce.  To tell you the truth, I have no idea how I came up with the idea of putting horseradish sauce on it, but it worked out quite well, so I was very pleased with the combination.

Well enough talking from me! Here is the recipe for Parmesan, Kale, and White Bean Burgers

Image

INGREDIENTS

  • 1/2 onion, diced
  • 2 garlic cloves, minced
  • 2 large leaves kale, stems removed, leaves chopped
  • 2 tablespoons water
  • 1/2 teaspoon ground cumin
  • 1/8 teaspoon red pepper flakes
  • 1/8 teaspoon paprika
  • salt and pepper, to taste
  • 3 cups cooked white beans (or 2, 15 oz. cans rinsed and drained)
  • 1 teaspoon red wine vinegar
  • 1/4 cup grated parmesan
  • 2 sun-dried tomatoes, diced
  • 1/2 cup breadcrumbs
  • 2 eggs

DIRECTIONS

In a skillet set over medium heat, cook onion and garlic, in bit of oil, until softened. Add kale, water and spices. Cook until kale is wilted.

Mash beans in a large bowl with a potato masher or the back of a fork. Add kale mixture and remaining ingredients, mashing as you go. Season mixture with salt and pepper.

Divide and form into 6 patties. Cook on the grill or the stove top over medium heat, until both sides are browned and patties are heated through.

Serve over a bed of lettuce and drizzle with horseradish sauce (recipe below)

HORSERADISH SAUCE

INGREDIENTS

  • 1/4 cup sour cream
  • 3-4 tablespoons prepared horseradish

DIRECTIONS

Mix sour cream and horseradish together until blended.

Recipe courtesy of kitchensimplicity.com

This was a recipe that I stepped out on a limb for, and it ended up being really delicious; in the end, a good risk taken.  So go ahead, buy your first (or 100th) head of kale and take the leap of faith.  Enjoy!