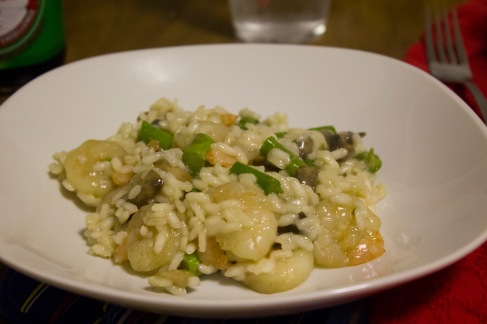
Shrimp, Mushroom, and Asparagus Risotto

Rice is a staple food in many cultures and is a very versatile ingredient.  Growing up with an Indian (and jewish) background, we had a lot of rice with our meals.  But surprisingly it wasn’t until college that I actually made rice by myself.  It’s a pretty easy process, and if you have a rice cooker (which I have not yet invested in) it’s even easier.  It’s a great grain to eat with sauces too because it soaks it right up.

Risotto is also a type of rice (Arborio Rice) but unlike many other types of rices, it is much more starchy.  This scared me a little because I wasn’t sure what that mean cooking-wise.  I had only really eaten risotto in restaurants before this, so I was cautious around the idea of making a risotto dish.  But my roommate Liz seemed to know the basic process, so I decided to give this recipe a try.

Here is the recipe for Shrimp, Mushroom, and Asparagus Risotto:

Image

Ingredients

  • 6 cups chicken broth
  • 3 tablespoons olive oil
  • 1/2 pound white mushrooms, chopped
  • 10-15 spears of asparagus, chopped
  • 12 oz uncooked shrimp
  • 1 1/2 cups Arborio rice
  • 1/2 cup dry white wine
  • sea salt to taste
  • freshly ground black pepper to taste

Directions

  1. In a saucepan, warm the broth over low heat.
  2. Warm 2 tablespoons olive oil in a large skillet over medium-high heat. Stir in the mushrooms and asparagus and cook until mushrooms are soft, about 3 minutes. Add shrimp and cook until barely firm.  Remove all contents from pan and set aside.
  3. Add 1 tablespoon olive oil to skillet.  Add rice, stirring to coat with oil, about 2 minutes. When the rice has taken on a pale, golden color, pour in wine, stirring constantly until the wine is fully absorbed. Add 1/2 cup broth to the rice, and stir until the broth is absorbed. Continue adding broth 1/2 cup at a time, stirring continuously, until the liquid is absorbed and the rice is al dente, about 15 to 20 minutes.
  4. After the rice is done, turn heat to low and add the mushrooms, asparagus ,and shrimp back to the rice.  Cook for about 3 minutes.
  5. Remove from heat, add salt and pepper, and serve.

This recipe ended up being a lot easier than I anticipated.  It took a little longer than regular rice, but because of the chicken broth, the rice was a lot more flavorful then I expected.  This is now one a go-to recipe for Liz and I because the steps and ingredients are simple and the result is delicious! Enjoy!

Cheesy Brussels Sprouts

Brussels Sprouts have always been a weird food to me.  When I was younger, it was one of those taboo foods that I just wouldn’t eat.  But as I’ve gotten older and a little more willing to try things out of my comfort zone, I’ve warmed up to the idea of them.  My mom is an amazing cook, so she introduced brussels sprouts into my diet in a variety of different ways.  But I have never actually cooked them myself.  After having brussels sprouts in a few different ways, I realized that they can be overcooked very easily, and when they are overcooked they turn to mush…fast!

When I decided to make brussels sprouts for the first time, I wanted to make sure that I didn’t overcook them.  Obviously I asked my mom for a few tips because she is the expert, but I wanted to figure it out on my own as well.  I chose to use this recipe because, 1: I love cheese, and 2: because I was not ready to eat brussels sprouts plain…yet.  I wanted some type of sauce or other flavor to contrast the flavor and texture of the brussels sprouts.

Here is the recipe for Cheesy Brussels Sprouts:


Ingredients:

  • About 1.5 pounds of Brussels sprouts, halved
  • 3-4 Tablespoons extra-virgin olive oil
  • salt and pepper to taste
  • 2 Tablespoons butter
  • 2 Tablespoons flour
  • 1.5 cups milk
  • 1 cup parmesan cheese, grated
  • 1/2 teaspoon kosher salt
  • 1/4 cup mayo
  • black pepper to taste

Directions:

Pre-heat oven to 425°F

  1. Clean and trim stems of Brussels sprouts. Cut in half. Place all halves flat-side down on a baking sheet and drizzle with extra-virgin olive oil, salt, and pepper
  2. When the oven is pre-heated, put the brussel sprouts in the oven for about 15 minutes or until the bottoms of the brussels sprouts are browned.
  3. Meanwhile, in a large pan, melt butter then add flour and quickly stir with whisk to combine and remove clumps. Turn off heat.
  4. Add milk, salt, cheese, mayo and black pepper. Stir until cheese is melted.
  5. Add Brussels sprouts and combine with cheese mixture. Pour into baking dish and turn down the oven to 350°F.  Bake for about 10-15 minutes or until brussels sprouts are tender but not mushy and cheese sauce is barely bubbling.
  6. If desired, sprinkle extra cheese on top of the brussel sprouts.
  7. Let cool for 5 minutes and serve.

Recipe adapted from Whiteonricecouple.com

I was so impressed with how these turned out.  I realized that whatever I wasn’t cooking I was missing out on.  Now I’m going to try and challenge myself to work with ingredients that I am not necessarily familiar with.  That way I can discover all kinds of new recipes!

Let’s start with the basics…Bread

Bread. we eat it all the time and it is definitely a staple in college.  Although buying it at the supermarket is easy and fast, I have a few reservations when it comes to cheap bread. Why the heck do so many breads contain high fructose corn syrup?!  I was so surprised when I first found this out; I didn’t want to believe it, so I checked the labels myself.  And sure enough, there it was in the ingredients list of a variety of breads at the store, along with some other ingredients that I couldn’t quite pronounce.

It was then that I decided that I should just make my own bread! Then I could decide and know exactly what I was eating.  The only problem was time.  Real bread (with active yeast) takes about 4-5 hours to make (including rising time), and in between classes, practice, and other college life commitments, there was no way that was happening during the week.  But weekends were a different story.  On a normal Saturday I get up really late, go on Facebook, and watch TV.  So I figured if I devoted 4 of those hours to baking bread, it would not be a huge sacrifice….And boy was I right.  That was the best decision I ever made.  Not only did the bread taste WAY better (and fresher) than anything at the store, but it also made the whole apartment smell like a bakery. How can you argue with that?!

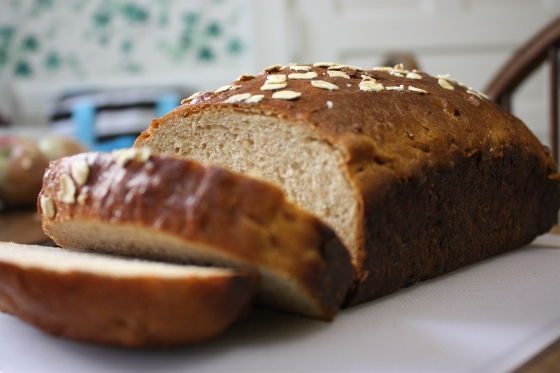
Here is the recipe for the scrumptious Honey Wheat bread I made.

Honey Wheat Bread

Honey Wheat Bread

This recipe makes 2 loaves of bread, but since this was my first time making it, and since there is only one loaf pan in the apartment, I made a half recipe.

INGREDIENTS

  • 2 cups whole milk
  • 1 cup old-fashioned rolled oats (not quick-cooking) plus additional for topping
  • 1/2 cup warm water (105-115°F)
  • 2 tablespoons active dry yeast (from 3 packages)
  • 1/2 cup mild honey
  • 1/2 stick (1/4 cup) unsalted butter, melted and cooled, plus additional for buttering pans
  • 3 cups stone-ground whole-wheat flour
  • About 2 cups unbleached all-purpose flour
  • 1 tablespoon salt
  • Vegetable oil for oiling bowl
  • 1 large egg, lightly beaten with 1 tablespoon water
  • Special equipment: 2 (8- by 4-inch) loaf pans

DIRECTIONS

Heat milk in a 1 1/2- to 2-quart saucepan over low heat until hot but not boiling, then remove pan from heat and stir in oats. Let stand, uncovered, stirring occasionally, until cooled to warm.

Stir together water, yeast, and 1 teaspoon honey in a small bowl; let stand until foamy, 5 minutes. (If mixture doesn’t foam, discard and start over with new yeast.) Stir yeast mixture, melted butter, and remaining honey into cooled oatmeal.

Stir together whole-wheat flour, 1 1/2 cups unbleached flour, and salt in a large bowl. Add oat mixture, stirring with a wooden spoon until a soft dough forms. Turn out onto a well-floured surface and knead with floured hands, adding just enough of remaining unbleached flour to keep from sticking, until dough is smooth, soft, and elastic, about 10 minutes (dough will be slightly sticky). Form dough into a ball and transfer to an oiled large bowl, turning to coat. Cover bowl loosely with plastic wrap and a kitchen towel; let rise at warm room temperature until doubled in bulk, 1 to 1 1/2 hours.

Lightly butter loaf pans. Turn out dough onto a lightly floured surface and knead several times to remove air. Divide dough in half and shape each half into a loaf, then place 1 loaf in each buttered pan, seam side down, tucking ends gently to fit. Cover loaf pans loosely with a kitchen towel and let dough rise in a draft-free place at warm room temperature until doubled in bulk, about 1 hour.

Put oven rack in middle position and preheat oven to 375°F. Lightly brush tops of loaves with some of egg wash and sprinkle with oats, then bake until bread is golden and loaves sound hollow when tapped on bottom, 35 to 40 minutes. (Remove 1 loaf from pan to test for doneness. Run a knife around edge of pan to loosen.)

Remove bread from pans and transfer to a rack to cool completely, about 1 1/2 hours.

(Recipe courtesy of epicurious.com )

——————————————————————–
Don’t be afraid to make something new, or put a little time into your cooking!  After making this bread, I realized that, not only was it cheaper in the long run to just make my own bread, but it was also a great experience.  And now, since I know the basics of bread making, I can make all different kinds!  So get off Facebook, and get in the kitchen and make some bread!  Everyone will be jealous, you’ll see! Enjoy!